Did anyone know that modern brick making is as much science as it is art? It’s a fascinating process that combines traditional methods with advanced technology in the Brick Industry.
As a seasoned expert in modern brick making, I bring a wealth of knowledge and experience to this discussion. My insights are shaped by years of working closely with cutting-edge brick and pipe&pole making technologies.
The modern brick making process is a journey of innovation. It’s about turning raw materials into durable bricks with precision and efficiency.
In this guide, we’ll explore each step of the brick making process. From selecting the right clay to the final firing, you’ll get a comprehensive understanding of how modern bricks are made.
Read on to discover the fascinating world of modern brick making.
Step#1 Raw Material Extraction
Brick making begins with the extraction of raw materials, primarily clay or shale. Curious about how modern bricks are made? Here’s how it’s done:
Site Selection and Analysis
The first step in raw material extraction is identifying and analyzing potential sites. Geologists and experts conduct thorough examinations of land to locate clay or shale deposits. They assess the quality, quantity, and accessibility of the material. Soil samples are taken and tested to determine their suitability for brick making. Factors like plasticity, color, and purity are crucial in this analysis.
Excavation Techniques
Once a suitable site is identified, the excavation process begins. The method of extraction depends on the depth and nature of the material. For surface deposits, bulldozers and backhoes are typically used. For deeper deposits, more complex machinery like draglines and excavators may be necessary. The goal is to extract raw materials with minimal impurities and disruption to the surrounding environment.
Transportation and Storage
After extraction, the raw materials are transported to the brick manufacturing site. Trucks or conveyor belts are commonly used for transportation. Upon arrival, the materials are stored in designated areas. Proper storage is crucial to prevent contamination and ensure that the clay or shale maintains its desirable properties.
| Raw Material |
Description |
| Clay |
A primary raw material for traditional brick-making. |
| Sand |
Often mixed with clay to improve texture and strength. |
| Water |
Used as a binding agent to form brick shapes. |
| Cement |
Sometimes added to enhance durability and strength. |
| Fly Ash |
A waste product from coal combustion, used as a substitute for cement. |
| Lime |
Used to stabilize clay and improve brick quality. |
| Straw or Rice Husks |
Added for insulation and to reduce weight in some cases. |
| Color Pigments |
Added for aesthetic purposes to create colored bricks. |
| Additives (e.g., ash, plasticizers) |
Used to modify properties like setting time and plasticity. |
| Recycled Materials |
Old bricks, glass, or other waste materials can be used to reduce environmental impact. |
| Chemical Stabilizers |
Used in some brick types to improve water resistance. |
Step#2 Preparation of Raw Materials
After the extraction of raw materials, the next critical step in brick making is their preparation. This stage refines clay or shale to meet specific brick production requirements. Here’s a discussion on its phases:
- Crushing and Grinding: The extracted raw materials are first crushed into smaller pieces using crushers. Then, they are ground into finer particles. This is essential for achieving uniform consistency, which is critical for quality brick production. The finer the particles, the better the quality of the bricks.
- Screening for Impurities: After crushing, the ground material is then screened to remove impurities such as stones, roots, or large clumps. This step is vital for maintaining the purity and quality of clay or shale.
- Blending for Consistency: Different types of clay or shale may be blended to achieve the desired properties in the final product. The blending process ensures uniformity in color, texture, and firing characteristics.
- Water Addition for Plasticity: As per Biokeram, water content in brick manufacturing can range from 10% in stiff extrusion processes to above 30% in soft mud factories and higher in hand-made methods. This variation underscores the importance of precise water addition for optimal brick plasticity.
- Aging and Tempering: Lastly, the prepared mixture is then allowed to age. This process can last from a few hours to several days. Aging helps in improving the plasticity of the material. Tempering, on the other hand, involves kneading the mixture to ensure even distribution of moisture and consistency.

Step#3 Blending and Grinding
Following the preparation of raw materials, the next step in the brick making process is blending and grinding. This step is crucial for ensuring uniformity and consistency in the brick mixture. See the following processes:
- Homogenizing the Clay: The primary goal of blending is to homogenize the clay or shale. This ensures that the final product has consistent color and texture. Uniformity in the raw material is key to producing bricks that are uniform in quality and appearance.
- Fine Grinding: After blending, the material undergoes a second, finer grinding process. This is critical for achieving the right particle size, which greatly affects the quality of the bricks. The smaller and more uniform the particles, the better the overall quality of the brick.
- Adding Additives: At this stage, additives may be introduced into the mixture. These can include materials like sand or sawdust, which help in controlling shrinkage and firing characteristics of bricks. For example, adding sand helps reduce clay shrinkage during drying and firing, improving the brick’s stability.
- Precision Blending: Adjusting the blend of clays to achieve a specific brick color, such as a consistent red hue, is a critical task. This involves combining different clays, each contributing unique characteristics to reach the desired outcome.
- Quality Control: Continuous quality control is essential during this stage. Samples are regularly taken and tested to ensure that the blending and grinding processes are producing a consistent and high-quality mixture.
Step#4 Forming and Shaping Process
With the blended and finely ground raw materials ready, the next critical phase in brick making is forming and shaping. This stage transforms the prepared clay into bricks with precise dimensions and shapes. Let’s explore some key aspects of this process:
- Transition from Blending to Forming: the transition from blending and grinding to forming is seamless. The finely tuned mixture is now ready to be molded into its final form. It’s remarkable to see the clay smoothly take shape, marking a key step in its transformation into bricks.
- Molding Techniques: There are several methods for molding bricks, including hand molding, machine molding, and extrusion. The choice depends on the desired texture and size of the bricks. For example, extrusion is popular for its efficiency in producing large quantities of uniformly shaped bricks.
- Wire Cutting for Uniformity: In the extrusion process, a continuous column of clay is forced through a die, creating a long ribbon of material. This ribbon is then sliced into individual bricks using a wire cutter, ensuring uniform size and shape.
- Custom Shaping: In cases where unique architectural designs are required, bricks are molded into special shapes using custom-designed molds. These tailor-made molds allow for a variety of shapes and sizes, accommodating unique structural and aesthetic needs in construction projects.
- Drying to Set the Shape: Once shaped, the bricks are left to dry. This is a critical step to set their form before firing. The drying process must be controlled to prevent cracking or warping of the bricks.
Step#5 Drying Phase
Once the bricks are shaped, the next crucial step is the drying phase. This stage is essential for reducing moisture in the bricks, setting the stage for their firing and final hardening. Here’s an overview of the drying phase:
- Transition from Shaping to Drying: Firslty, post shaping, bricks contain a significant amount of moisture that needs to be reduced. The drying phase is crucial to ensure that bricks don’t crack or warp during firing.
- Controlled Environment Drying: Secondly, bricks are typically placed in a controlled drying environment to slowly and evenly reduce their moisture content. This gradual drying helps in maintaining the shape and integrity of the bricks.
- Use of Drying Racks or Tunnels: Thirdly, Depending on the scale of production, bricks are either placed on drying racks or passed through drying tunnels. These methods even ensure exposure to air and temperature, crucial for consistent drying.
- Monitoring Moisture Levels: Next, the moisture content of the bricks is closely monitored throughout this stage. It’s important to achieve the right balance – too much moisture can lead to cracking during firing, while too little can make the bricks brittle.
- Time and Temperature Considerations: Lastly, the duration and temperature of the drying phase vary based on the type of clay and the size of the bricks. Each batch of bricks tells its own story in the drying phase, reflecting the nuances of the clay and the craftsman’s touch.
Step#6 Firing the Bricks
Having emerged from the drying phase with significantly reduced moisture, bricks are now ready for the most transformative stage: firing. This process hardens the bricks and gives them their final strength and color. Here’s a look at the firing process:
- Transition to Firing: Begins by the transitioning from the drying phase to firing is critical. Properly dried bricks ensure a successful firing process, preventing damage like cracking or warping.
- Choosing the Right Kiln: Next, there are various types of kilns used for firing bricks, including traditional clamp kilns, tunnel kilns, and modern Hoffmann kilns. The choice depends on factors like production scale, desired brick quality, and efficiency.
- Setting Firing Temperatures: The temperature and duration of firing vary based on the type of clay and the desired properties of the brick. Generally, temperatures range from 900°C to 1200°C. This high heat triggers chemical changes in the clay, solidifying and strengthening the bricks.
- Monitoring the Systems: At this stage, modern firing processes often utilize advanced systems like Tabrick for precise control and monitoring of temperature and firing duration. This ensures uniform quality and minimizes defects in the final product.
- Cooling Phase Post-Firing: After firing, bricks are gradually cooled. This step is as important as the firing itself. Rapid cooling can lead to cracks, so it’s a slow and steady process, almost like watching the bricks come of age.
Step#7 Cooling Stage
Building on the intense heat of the firing stage, the next critical process in brick making is the cooling stage. This phase is crucial for ensuring the structural integrity and final quality of the bricks. Here’s an insights of the cooling stage:
- Gradual Transition from Firing to Cooling: A gradual transition from the high temperatures of firing to cooling is essential. Sudden temperature changes can damage the bricks, so this process is carefully controlled.
- Controlled Cooling Environment: Bricks are typically cooled in a controlled environment to avoid thermal shock. The cooling process is often done in the same kiln where firing occurs, using regulated airflow and temperature control.
- Monitoring Temperature Decrease: The rate of temperature decrease is closely monitored. A steady and slow reduction in temperature is key to preventing cracks and other structural defects in the bricks.
- Duration of the Cooling Process: The duration of the cooling phase varies depending on the type of kiln and the size of the bricks. It can range from a few hours to several days.
- Ensuring Brick Stability: This stage always feels like a period of rest and stabilization, allowing each brick to solidify its strength and character. Proper cooling ensures that the bricks attain their final hardness and color, ready for use in construction.
Step#8 Quality Control and Testing
With the bricks having undergone the cooling stage, they are now ready for the final and crucial phase: quality control and testing. This stage is essential to ensure that the bricks meet industry standards and are suitable for construction purposes. Let’s take a look at some key aspects:
Visual Inspection
Each batch of bricks undergoes a visual inspection. This involves checking for uniformity in size, shape, and color. Any bricks with visible defects, such as cracks or warping, are removed from the batch. The surface of each brick is examined for smoothness and texture consistency. Variations in surface quality can indicate issues during the firing or cooling stages.
Dimensional Accuracy
Precision tools are used to measure the dimensions of bricks. This ensures that they conform to specified size standards, which is vital for ensuring uniformity in construction. Bricks are checked for straightness and flatness. Warped bricks can lead to issues in building projects and are usually discarded or repurposed.
Physical Strength Testing
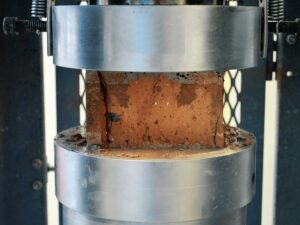
One of the most critical tests assesses how much weight a brick can withstand before failing. It’s a key indicator of the brick’s suitability for structural purposes. This test measures how much water a brick can absorb, which is important for understanding its durability and suitability for different climates and environments.
Final Approval and Packaging
Once bricks pass all tests, they are packaged for distribution. This involves sorting them into lots based on quality and intended use. Each batch is accompanied by documentation certifying its quality. This includes test results and compliance with relevant standards. As each batch of bricks passes through this rigorous testing, it reaffirms the commitment to quality and precision that is central to modern brick making.
Step#9 Storage and Distribution
Building on the rigorous quality control and testing phase, the final step in the brick making process is storage and distribution. This stage is crucial for ensuring that the finished bricks reach their destination in perfect condition. Below are the steps that need to follow:
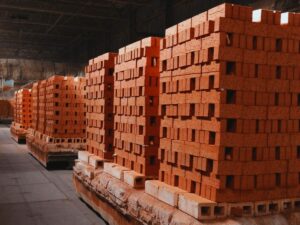
Organized Storage Systems: Post-production, bricks are moved to storage facilities where they are stacked in a manner that prevents damage and preserves their quality. These facilities are often climate-controlled to protect bricks from environmental factors like moisture and extreme temperatures.
Inventory Management: Effective inventory management is key in this phase. Utilizing advanced systems like those provided by Tabrick helps in maintaining an accurate count of stock, tracking different types of bricks, and managing orders efficiently.
Careful Packaging and Handling: Bricks are carefully packaged, often on pallets, and wrapped to ensure they remain secure and intact during transportation. This packaging is designed to protect the bricks from chipping and breakage.
Efficient Distribution Networks: An efficient distribution network is vital for timely delivery. This involves coordinating with trusted logistics partners and planning routes that optimize travel time and fuel efficiency. Special care is given to loading and unloading to maintain the bricks’ quality during transport.
Final Customer Delivery: The delivery process is the last step in the journey of bricks from factory to construction sites. This step, blending skilled craftsmanship with precise logistics, transforms the bricks from raw materials into key components of architectural designs.
Conclusion
This comprehensive guide has journeyed through the detailed and intricate world of modern brick making, shedding light on each vital stage of the process. It offers a comprehensive look into the art and technology behind creating durable, high-quality bricks, aiding those in the industry to understand and refine their craft.
For those seeking to enhance their brick-making endeavors, Tabrick offers innovative solutions tailored to modern demands. Reach out and feel free to contact us. We are here to assist and guide you!


